Saturday, July 30, 2011

Rocker Chic Nail Art


Taylor Momsen

I love a rocker chic style. Pink and black compliment each other. I'm going to show you a Nail Art inspired by a Rocker Chic. I often see tutorials on YouTube that uses pink and black nail polish. 

First of all, I just wanna tell you guys that I never thought that this Rocker Chic nail art would be successful. This was my first attempt and I'm happy with what I've finished.

Let's Begin.


I applied a base coat to protect my nails. To my LEFT hand, I painted my thumb, index and middle fingernails pink. I painted black on my ring and pinky fingernail. Do the same on your RIGHT but it should be vice verza.
---


Make a French tip to your index and pinky. If your polish is pink, make a black French tip.. Vice verza.
---


Draw a heart on your thumb.
---


Do the same thing on your middle fingernail. Make a dots on the rest of the nails. (Index - the dots should be on the French tip. Ring - make a dots that looks like a cross. Pinky - dots should be on the lower portion.
---


Put a rhinestones to your French tip, at the sides of the heart on your middle fingernails and put the rhinestone to the dots that you made on your ring fingernails.
---


To your thumb, put rhinestones all over the heart shape.
---

Fin!


Enjoy your Rocker Chic Nail Art!


:-)

Tuesday, July 26, 2011

Mermaid Eyes by Sushee


 I love make up so much. My friends and I share the same interests. All of my friends are gorgeous. Today, I'm gonna feature one of my bff. Her name is Socel. We call her Sushee for some reasons. Anyway, I like the way she do her hair and make up.  In other countries they call it "combo". It's really hard to specialize both, but to her......it's just a piece of cake!

Just this month, we saw each other again. Oh man, we've been busy. I was surprised to see her. She's perfect. I've been trying to convince her to do a tutorial because she's really good at make up, hair and fashion. I'm so glad to learn that she finally decided to do it.


Technically, what I'm going to feature is her very first tutorial. Exclusive here on my blog. Haha! I feel like a reporter saying that!

Let's begin.

From a so-so picture to an awesome outcome.
---


1)Sushee applied a light yellow eye shadow all over her lid.
---


2 Then she applied Aquatic Blue Green to the middle lid.
---


3 Next is the green eye shadow on her outer lid.
---


4 She blended the colors with Aquatic Crisp in Blue Green shade.
---


This is how it should look like..
---


5 She used a very light purple to her inner crease.
---


6 On the above of her crease, she used a dark violet.
---


7 She then applied baby pink to the outer crease.
---


8 She traced her eyes using the Nichido Liquid Eye Liner. As you can see, she drew a wing effect at the end of her eye lids. I love this technique!

9 Last but not the least, the falsies. 

---

Voila!


These are the following make up that Sushee used for this Mermaid Eyes Tutorial


I hope you enjoy the tutorial. Please support her upcoming blog!
:-)

Monday, July 25, 2011

Simple White Flower Nail Art


I love my new LUCIDarlinng Fantastic nails by Etude House. I think it looks good as it is. Very elegant. it's perfect for any occasion. It's an eye catcher. Knowing myself, I knew that no matter how much pretty as it is, I 'm still gonna make a nail art to my perfectly polished nails.


As you can see on the picture above, my ring fingernails was already worn out.
---


I re-applied another coat.
---


I used a dotting tool and a platinum white nail polish to create petals.
---


I swept the wet nail polish towards the center to create a 3D effect
--- 


It should look like this.
---


Then I applied a top coat and a quick dry.
---


Then I added a yellow rhinestone at the center of the petals.
---

Now it's done. See, I told you.. It's really easy to do. It made my nails cuter.
I love the simplicity of it.


:-)

Sunday, July 24, 2011

Domo-kun Nail Art


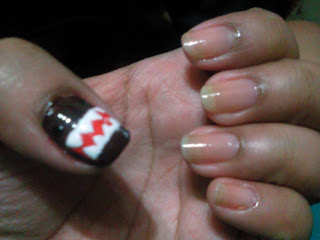
I'm so in love with Domo-kun. In fact, I have some Domo-kun pillows and bags. It was a gift from a love one.  Hee hee. Anyway, I'm going to show you guys how I did this nail art inspired by one of my favorite characters.


Let's begin.

I'm going to show you first how I did Domo-kun's face on my thumb.
Apply a nail hardener as a base coat. Then Apply a brown nail polish on your thumb. I used  Petite Nails by Etude House.


Draw a rectangle using a red nail art pen or use a thin brush. I used a red Nail Star two way nail art pen.


Draw 4 fangs using a white nail polish. Again, you can use a nail art pen or a thin brush.


Get a black rhinestone and put it at the upper side portions of the mouth. The rhinestones will serve as Domo's eyes.


This is how it should look like. :-)


---

Now, we're going to do the designs for the remaining nails.

Apply a red nail polish to your index finger. I used Ruby Red by San San.


---

Make a french tip on your middle finger using a black nail art pen or a balck polish with thin brush.


---

Apply a white nail polish on your ring finger.


---

Make a french tip on your pinky using a brown nail polish.


---

This is how it should look  like.


Index - Use a dotting tool make dots all over your index finger using a white nail polish. 
Middle - Make a straight line at the center of your nails overlapping the black French tip and put a white rhinestone at the center of the line.
Ring - Create a dots at the center of the nail upwards (diagonal). Make another dots at the edge of the nail. Use red nail polish.
Pinky - Make a straight line at the center using a white nail polish overlapping the brown French tip ang put red rhinestone at the center of the line.


You can now enjoy your Domo-kun nail Art!
Enjoy!


:-)


Thursday, July 21, 2011

Bollywood Wedding Nails


Hi girls! I'm back! I've been busy the whole week. I haven't had any nail polish on for 3 days. Would you believe that? Haha. 

For this blog, I'm gonna feature a Nail Art that I saw from YouTube. I really love the design especially the color combination of Red and Gold. 


Let's Begin.

1 Start by applying base coat to protect your nails.


---

2 Apply two coats of any Gold nail polish. Mine was from Caress, Pure Gold.


---

3 Apply a gold dust to add more shimmer.


---

4 Using a nail art pen, draw lines, curves and dots. It's really up to your imaginations.


---

Done!
You can now enjoy your Bollywood Wedding Nail Art.
:-)


Bollywood Wedding Nails can also be done on your toenails.


---Inspired by:


I hope you like it. 

:-)