Wednesday, August 3, 2011

First Time!

Oh my gosh! I bought this fake nails and I haven't tried using it before. As I've told you on my past blog, I had a Chronic Onychophagia. It means, I bit my nails until it bleeds. 

Anyway, if I only knew about this fake nails before... i could have used it instead of going o the nail salon for acrylic nails that are so pricey. 

This is going to be my very first try on using fake nails. 

---

It took me the whole day of filing these just to fit my nails. It's really hard because most of them are bigger than my actual nails.  The only perfect size they have are the thumb nails. I don't have to file them anymore because it fits.


---
I used Violet Glam by San San. i encourage my countrymen to use our own product rather than using imported and pricey brand. Let's help our economy.


---
Ironically this is the nth time I tried using Konad. I've bee practicing because it's really hard for me to create designs using plates and stamp. 


---

I love how it turned out. :)


:-)

I hope you enjoyed it.


Monday, August 1, 2011

Gaikokujin Gyaru by KG

Hi girls! How's life been treating you? :-) I hope you're doing good just like me. I'm really excited right now because I'm so honored to feature a friend of mine who's an internet sensation because of her good looks and slamming body. Hot! Hot! Hot!

Ready?
Ladies and Gentlemen, I would like to present.....

Khaye Garcia

She's Filipina-Japanese model from Midori-shi, Gumma, Japan. She kinda reminds me of Jennifer Lopez. We think that she really looks like J. Lo minus Marc Anthony. Haha. Just look at the picture below. See? I told you so! :-)


I appreciate that she did this tutorial immediately after I asked her if I could feature her on my blog. She's so kind to say yes to my favor in spite of her very hectic schedule.

Without more further ado, here is Khaye Garcia's Gaikokujin Gyaru Make Up Tutorial.
---

She just woke up when we were talking about this tutorial. Look how pretty she is even without make up.

Before staring the tutorial, she exfoliated her skin first and applied a primer.
---

She had to pluck her eyebrows first and then she traced it nicely with an eyebrow pencil. She said that eyebrows are not the main focus for gyaru.
---

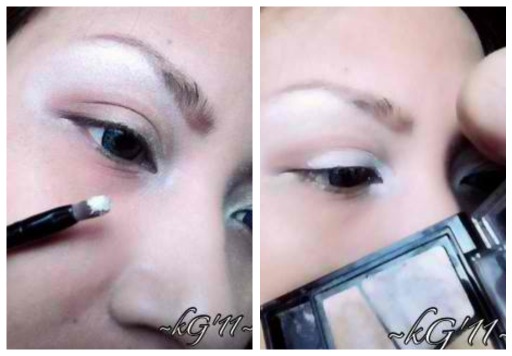
She applied a shimmering white eye shadow all over to her lids up to the brow bone.

It should look something like this..
---

Next, she applied a light brown eye to her lid.

As you can see, her lids are colored with a light brown eyeshadow.
---

She then applied a darker brown eyeshadow on her crease.

...and it'll kinda look something like this.
---

On her inner tear duct to her upper lash line, she applied a silver eyeshadow

It's getting prettier..
---

She applied a white eye liner to her water line. This will make her eyes appear bigger.
---
Khaye applied a black eyeliner to her lower lashline towards the outer V.
---

Using a liquid eye liner, Khaye drew a line on to her upper lashline towards the outer V, connecting the line she made to her lower lashline.
---

Time to put some falsies!


---

Tanned Pink for blush on!
---

Hmmmm... Which shade is better for lipstick?
Hot Pink?
.....or a Lighter Pink? Gosh. 
---

Hot Pink looks better on her. 
---

Yipee! Now it's done! Are you excited for the finished look?
Ta-da!


Soooooooo GORGEOUS!


I hope you enjoy this tutorial as much as I do.
:-)

Please follow her blog.

Saturday, July 30, 2011

Rocker Chic Nail Art


Taylor Momsen

I love a rocker chic style. Pink and black compliment each other. I'm going to show you a Nail Art inspired by a Rocker Chic. I often see tutorials on YouTube that uses pink and black nail polish. 

First of all, I just wanna tell you guys that I never thought that this Rocker Chic nail art would be successful. This was my first attempt and I'm happy with what I've finished.

Let's Begin.


I applied a base coat to protect my nails. To my LEFT hand, I painted my thumb, index and middle fingernails pink. I painted black on my ring and pinky fingernail. Do the same on your RIGHT but it should be vice verza.
---


Make a French tip to your index and pinky. If your polish is pink, make a black French tip.. Vice verza.
---


Draw a heart on your thumb.
---


Do the same thing on your middle fingernail. Make a dots on the rest of the nails. (Index - the dots should be on the French tip. Ring - make a dots that looks like a cross. Pinky - dots should be on the lower portion.
---


Put a rhinestones to your French tip, at the sides of the heart on your middle fingernails and put the rhinestone to the dots that you made on your ring fingernails.
---


To your thumb, put rhinestones all over the heart shape.
---

Fin!


Enjoy your Rocker Chic Nail Art!


:-)

Tuesday, July 26, 2011

Mermaid Eyes by Sushee


 I love make up so much. My friends and I share the same interests. All of my friends are gorgeous. Today, I'm gonna feature one of my bff. Her name is Socel. We call her Sushee for some reasons. Anyway, I like the way she do her hair and make up.  In other countries they call it "combo". It's really hard to specialize both, but to her......it's just a piece of cake!

Just this month, we saw each other again. Oh man, we've been busy. I was surprised to see her. She's perfect. I've been trying to convince her to do a tutorial because she's really good at make up, hair and fashion. I'm so glad to learn that she finally decided to do it.


Technically, what I'm going to feature is her very first tutorial. Exclusive here on my blog. Haha! I feel like a reporter saying that!

Let's begin.

From a so-so picture to an awesome outcome.
---


1)Sushee applied a light yellow eye shadow all over her lid.
---


2 Then she applied Aquatic Blue Green to the middle lid.
---


3 Next is the green eye shadow on her outer lid.
---


4 She blended the colors with Aquatic Crisp in Blue Green shade.
---


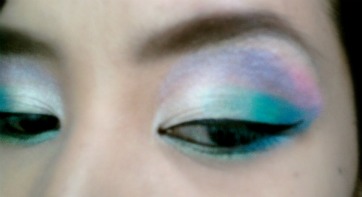
This is how it should look like..
---


5 She used a very light purple to her inner crease.
---


6 On the above of her crease, she used a dark violet.
---


7 She then applied baby pink to the outer crease.
---


8 She traced her eyes using the Nichido Liquid Eye Liner. As you can see, she drew a wing effect at the end of her eye lids. I love this technique!

9 Last but not the least, the falsies. 

---

Voila!


These are the following make up that Sushee used for this Mermaid Eyes Tutorial


I hope you enjoy the tutorial. Please support her upcoming blog!
:-)